Your information saved successfully.
Appointment Calendar
Make managing and scheduling appointments simple
In the app, press on the calendar icon in the upper left to see the total number of people with scheduled appointments by month or week. The navigation arrows can be used to move forwards and backwards through the months or weeks, and you can press on the date to jump directly to a specific week or month.
(Or in the web version, click Appointments on the upper left and then the calendar icon on the upper right.)
Choosing a day or time opens a more detailed daily view. There you’ll still see the totals in the left column for quick reference, and additionally can see which members of your team have appointments under their respective columns. Choose whether to display only arrivals in that time block, or the total number expected to be present at that time.
Arrivals show the total number of people, with the number of groups in smaller font below if more than one group is arriving in that time block:

The Scheduled option shows the total number of people and groups currently being served, regardless of when they arrived:
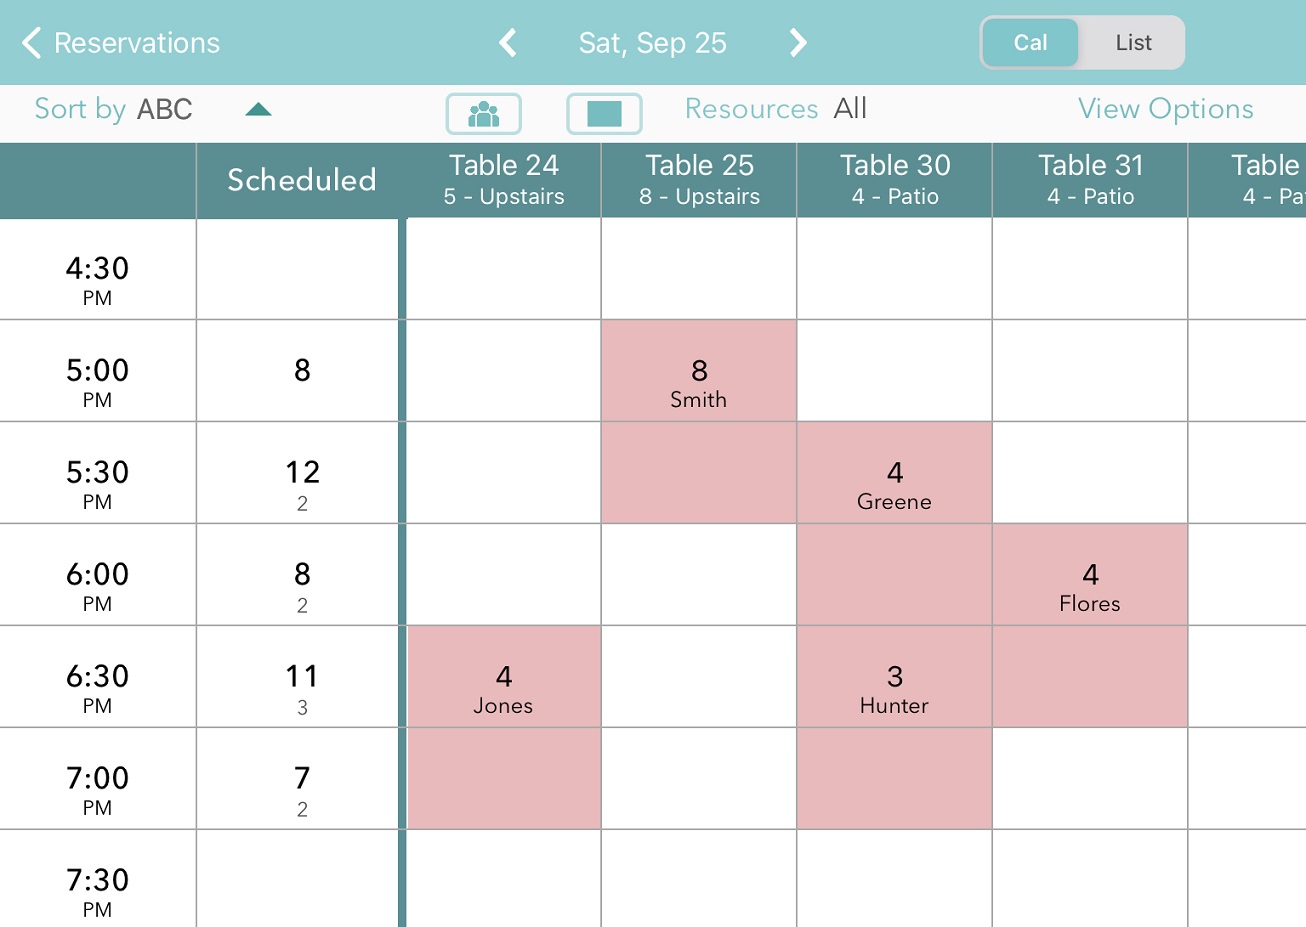
The resource names in the columns can be customized in the app settings, and Waitlist Me is flexible enough to be used for various types of appointments. Depending on your business these might be the names of hair stylists, sales people, technicians, doctors, and so on.
Appointment times for your team members will be highlighted in red to show estimated appointment durations, and this is based on an average time that can be set in the upper right. This gives a simple visual overview of your available times by team member, but doesn’t prevent scheduling an appointment in a block that is red.
Making an appointment at a specific time, for a specific team member, is done by selecting an individual cell. You then just enter the customer’s name and phone number. You can also add notes and choose a status. If you didn’t plan to assign the customer to a team member at that time, you can use the far left column to create the appointment.
To edit or cancel an appointment, just select the cell and press the Edit button. If there is more than one customer scheduled at that time, you’ll see a quick list to choose from. Another way to find a future appointment is by using the search icon from the main calendar screen. Search by a party’s name, phone number, or email address. From the search results, press on the customer’s row to open the Edit Party screen and make changes.
There is also an appointment list view that shows all the customers with appointments for that day along with any that might have been removed.
Finally, appointments are designed to be integrated with other parts of the Waitlist Me app. When you open your waitlist, you’ll see today’s appointments. When you check your Resources, you’ll see which team members are busy with customers, which ones are available, and which ones are scheduled for later. When you add a customer to your waitlist, you’ll see any relevant appointments. It helps you spend less time juggling scheduling tasks so you can spend more time providing great service to your customers.
See some additional information on setting up appointment options here. If you want clients to be able to schedule themselves, you can see more info on that here. To set up email confirmations, please visit this page.
(Or in the web version, click Appointments on the upper left and then the calendar icon on the upper right.)
Choosing a day or time opens a more detailed daily view. There you’ll still see the totals in the left column for quick reference, and additionally can see which members of your team have appointments under their respective columns. Choose whether to display only arrivals in that time block, or the total number expected to be present at that time.
Arrivals show the total number of people, with the number of groups in smaller font below if more than one group is arriving in that time block:
The Scheduled option shows the total number of people and groups currently being served, regardless of when they arrived:
The resource names in the columns can be customized in the app settings, and Waitlist Me is flexible enough to be used for various types of appointments. Depending on your business these might be the names of hair stylists, sales people, technicians, doctors, and so on.
Appointment times for your team members will be highlighted in red to show estimated appointment durations, and this is based on an average time that can be set in the upper right. This gives a simple visual overview of your available times by team member, but doesn’t prevent scheduling an appointment in a block that is red.
Making an appointment at a specific time, for a specific team member, is done by selecting an individual cell. You then just enter the customer’s name and phone number. You can also add notes and choose a status. If you didn’t plan to assign the customer to a team member at that time, you can use the far left column to create the appointment.
To edit or cancel an appointment, just select the cell and press the Edit button. If there is more than one customer scheduled at that time, you’ll see a quick list to choose from. Another way to find a future appointment is by using the search icon from the main calendar screen. Search by a party’s name, phone number, or email address. From the search results, press on the customer’s row to open the Edit Party screen and make changes.
There is also an appointment list view that shows all the customers with appointments for that day along with any that might have been removed.
Finally, appointments are designed to be integrated with other parts of the Waitlist Me app. When you open your waitlist, you’ll see today’s appointments. When you check your Resources, you’ll see which team members are busy with customers, which ones are available, and which ones are scheduled for later. When you add a customer to your waitlist, you’ll see any relevant appointments. It helps you spend less time juggling scheduling tasks so you can spend more time providing great service to your customers.
See some additional information on setting up appointment options here. If you want clients to be able to schedule themselves, you can see more info on that here. To set up email confirmations, please visit this page.