Your information saved successfully.
Email Notifications
Confirmations and reminders of reservations and appointments
Waitlist Me gives you the flexibility to notify customers with texts, calls, or emails, depending on your business needs. Emails can be more effective for reservations and appointments on future days, or when more information is required, or for sending automated reminders. Plus, they are not treated as notifications that count towards the bundled texting limits (US & Canada) or charged separately (international).
Enabling email notifications – In the Notification settings for reservations (Settings > Customization > Notifications > Reservation), choose “Email” to send messages as emails. There is also a “Scheduled” option to set email notifications to go out automatically at a specified amount of time before the arrival time. Alternatively, you can send email notifications manually by pressing the notification button in the customer row in the waitlist view. In either case, you’d be able to see when emails are sent in the waitlist view notes and customer visit area of the edit view.
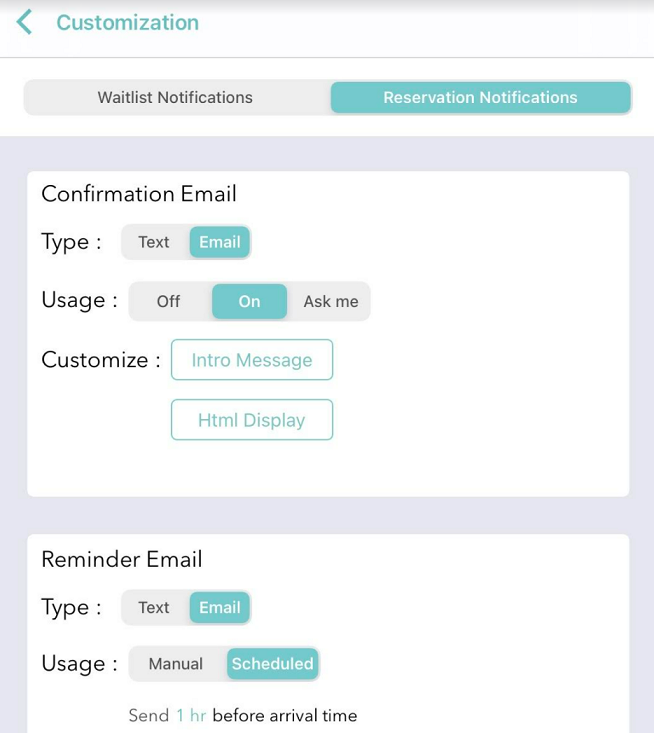
If your staff adds reservations, you would need to enable the Email field in the Add Party flow. On the web, this is under the gear icon > Adding Customers. In the app, go to the gear icon > Customization > Adding Customers. For the cases where customers schedule themselves from the web widget, on the website navigate to Account > Settings > Add Yourself. For the Input Fields, choose Reservations under Collect Email. Please note, if you select the Email option as your notification method, you would not be able to send a text for that notification. Therefore if you already have future reservations scheduled, you would want to enable the email field now, but not switch your notification to email until after the time that all future reservations include email addresses.
Customizing email notifications – All email notifications will show the scheduled time and location information. There are options to change the “Intro Message” that appears at the top of the email and can be used as an introduction or for basic instructions. There is a limit of 160 characters for text in this area to keep it simple. Pro users can also use the “HTML Display” option to customize the body of the email with text or HTML to provide more detailed instructions, images, and more. Below is an example of these parts of the email.
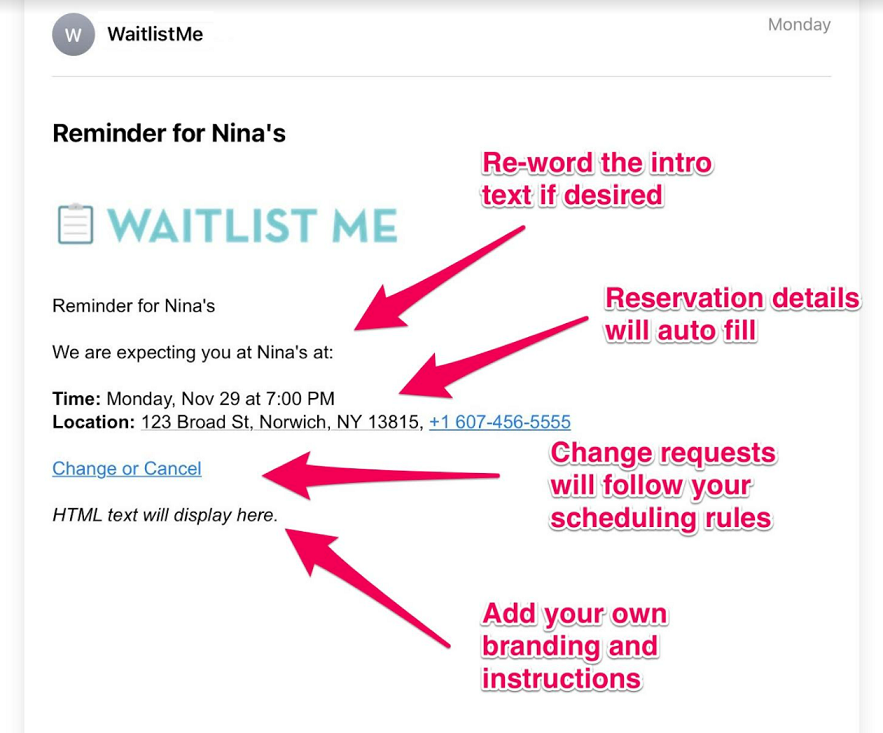
Changing and cancelling – Customers can easily update their plans by using the “Change or Cancel” link in the email notifications. This link opens a browser window on their phone or computer where they can cancel or select a different time. They will also automatically receive a confirmation email with their updated time.
For related information, check out these articles:
Customize Notifications | Manage Reservations | Manage Appointments
Enabling email notifications – In the Notification settings for reservations (Settings > Customization > Notifications > Reservation), choose “Email” to send messages as emails. There is also a “Scheduled” option to set email notifications to go out automatically at a specified amount of time before the arrival time. Alternatively, you can send email notifications manually by pressing the notification button in the customer row in the waitlist view. In either case, you’d be able to see when emails are sent in the waitlist view notes and customer visit area of the edit view.
If your staff adds reservations, you would need to enable the Email field in the Add Party flow. On the web, this is under the gear icon > Adding Customers. In the app, go to the gear icon > Customization > Adding Customers. For the cases where customers schedule themselves from the web widget, on the website navigate to Account > Settings > Add Yourself. For the Input Fields, choose Reservations under Collect Email. Please note, if you select the Email option as your notification method, you would not be able to send a text for that notification. Therefore if you already have future reservations scheduled, you would want to enable the email field now, but not switch your notification to email until after the time that all future reservations include email addresses.
Customizing email notifications – All email notifications will show the scheduled time and location information. There are options to change the “Intro Message” that appears at the top of the email and can be used as an introduction or for basic instructions. There is a limit of 160 characters for text in this area to keep it simple. Pro users can also use the “HTML Display” option to customize the body of the email with text or HTML to provide more detailed instructions, images, and more. Below is an example of these parts of the email.
Changing and cancelling – Customers can easily update their plans by using the “Change or Cancel” link in the email notifications. This link opens a browser window on their phone or computer where they can cancel or select a different time. They will also automatically receive a confirmation email with their updated time.
For related information, check out these articles:
Customize Notifications | Manage Reservations | Manage Appointments