Your information saved successfully.
Reservation Rules
Setting up time increments and other scheduling limits
Waitlist Me’s Web Widget allows customers to make reservations from your website. There are some basic settings optimizations you may want to make specifically for reservation usage, whether you’re using the widget or if staff will be entering all appointments. (If you haven’t started using your widget yet, see this page for the basic setup information.)
When logged into the website, go to Account > Settings > Add Yourself. The Main View section has a feature called Time Increments, which will control how frequently the time selection option shows reservation slots to customers. You can choose every 5, 10, 15, 30 or 60 minutes.
From the main waitlist page, click on the settings gear icon and choose Reservations. You can customize the time increments you want displayed on your calendar view and the average time a table or resource is occupied. Based on these settings you can block out your reservation availability visually in your calendar view.
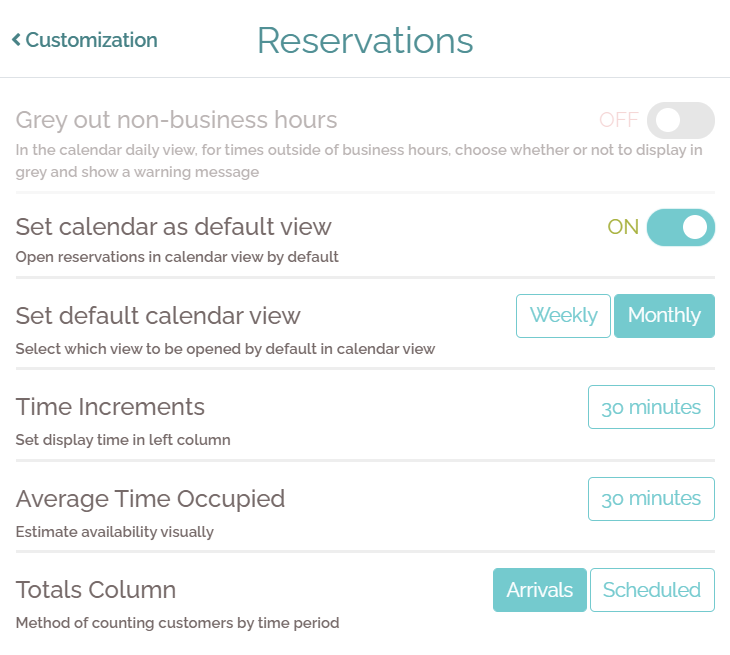
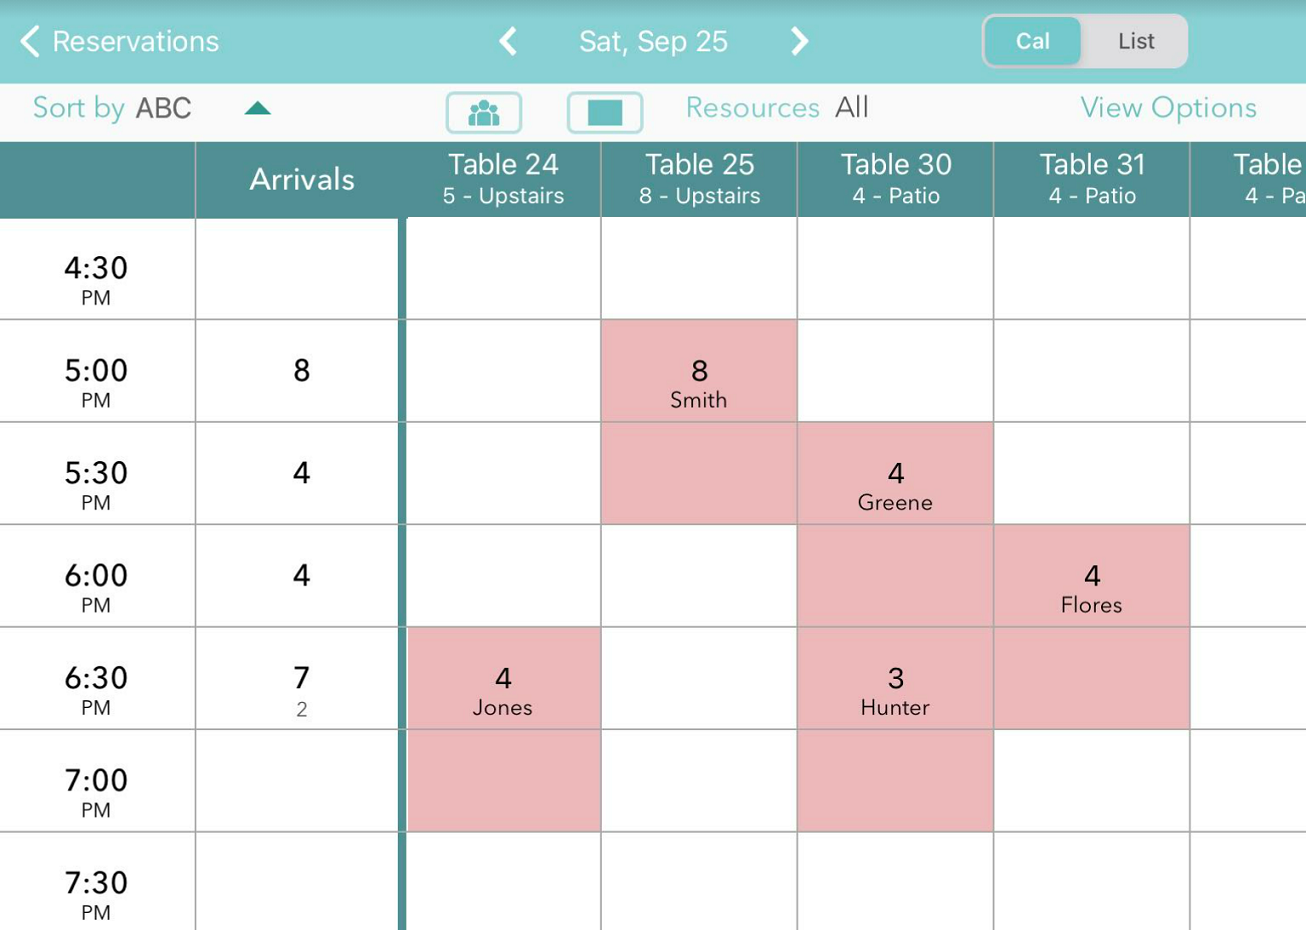
Choose to show tables as occupied either by how many parties will be arriving in a time block or by how many parties are expected to be currently seated in the time block. The Arrivals option shows the total number of people arriving, with the number of groups in smaller font below if more than one group is arriving in that time block:
The Scheduled option shows the total number of people and groups being served, regardless of when they arrived:

When your staff is in the process of scheduling reservations, there are options to find openings by room and by group size (please note, rooms are only available with the Platinum subscription). You can choose to view this information for quick reference by pressing the people and the room icons in the header bar. The group size and room name will then be visible in the column headers under each table name.
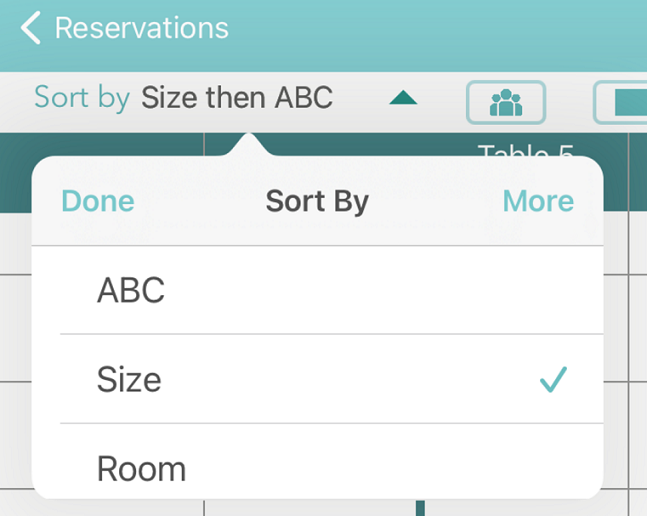
You can also sort the order of the table columns by these dimensions using the ‘Sort by’ option on the top left. Choose to sort by rooms if you know you want to fill one room before moving to another. Or sort by size to quickly find all the tables large enough for each party as you’re entering reservations. Use the ‘More’ option on the upper right of the sorting menu to add a secondary sort criteria and whether to display in ascending or descending order.
Some settings (including many view settings) are device-specific. These settings for how you prefer to view reservations would need to be updated on each tablet you plan to use. In the tablet you can navigate to the calendar and press in any time block to see an additional option on the upper right for changing views.
A Waitlist Me Pro or Platinum subscription also offers more controls for scheduling. You can set up party size limits by going to Account > Settings > Add Yourself > Input Fields. Under Size Limits, select reservations, waitlist, or both. Then you’ll see the option for minimums and maximums. There are also more scheduling features available with Business Hours, Display Hours, Scheduling Rules, and Blackout Dates. Please see this page to walk through these features. Also, this page reviews email reminder options available.
When logged into the website, go to Account > Settings > Add Yourself. The Main View section has a feature called Time Increments, which will control how frequently the time selection option shows reservation slots to customers. You can choose every 5, 10, 15, 30 or 60 minutes.
From the main waitlist page, click on the settings gear icon and choose Reservations. You can customize the time increments you want displayed on your calendar view and the average time a table or resource is occupied. Based on these settings you can block out your reservation availability visually in your calendar view.
Choose to show tables as occupied either by how many parties will be arriving in a time block or by how many parties are expected to be currently seated in the time block. The Arrivals option shows the total number of people arriving, with the number of groups in smaller font below if more than one group is arriving in that time block:
The Scheduled option shows the total number of people and groups being served, regardless of when they arrived:
When your staff is in the process of scheduling reservations, there are options to find openings by room and by group size (please note, rooms are only available with the Platinum subscription). You can choose to view this information for quick reference by pressing the people and the room icons in the header bar. The group size and room name will then be visible in the column headers under each table name.
You can also sort the order of the table columns by these dimensions using the ‘Sort by’ option on the top left. Choose to sort by rooms if you know you want to fill one room before moving to another. Or sort by size to quickly find all the tables large enough for each party as you’re entering reservations. Use the ‘More’ option on the upper right of the sorting menu to add a secondary sort criteria and whether to display in ascending or descending order.
Some settings (including many view settings) are device-specific. These settings for how you prefer to view reservations would need to be updated on each tablet you plan to use. In the tablet you can navigate to the calendar and press in any time block to see an additional option on the upper right for changing views.
A Waitlist Me Pro or Platinum subscription also offers more controls for scheduling. You can set up party size limits by going to Account > Settings > Add Yourself > Input Fields. Under Size Limits, select reservations, waitlist, or both. Then you’ll see the option for minimums and maximums. There are also more scheduling features available with Business Hours, Display Hours, Scheduling Rules, and Blackout Dates. Please see this page to walk through these features. Also, this page reviews email reminder options available.