Your information saved successfully.
Resource Set Up
Manage tables and other resources you assign to customers
Resources can be set up in the app settings as well as the online settings. Add and edit the resources you need and set the size for each resource.
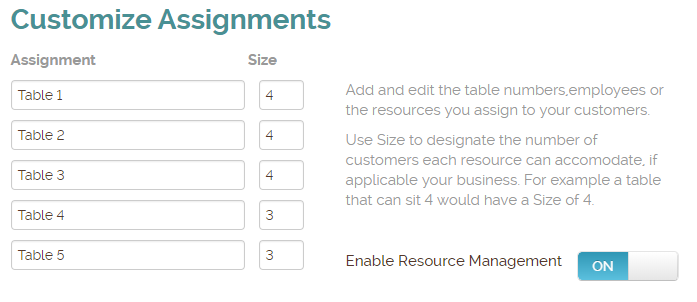
Online, you can go to Account > Settings > Resources. Change the names to whatever fits you – table numbers, stylist names, bowling lanes, etc. If your resource can accommodate a specific size, such as the number of seats at a table, add that as well. (If you serve individuals instead of parties, you can change your settings so you won’t see a group size option for resources. From the main waitlist page, that’s under the gear icon > Customization > Terms.)
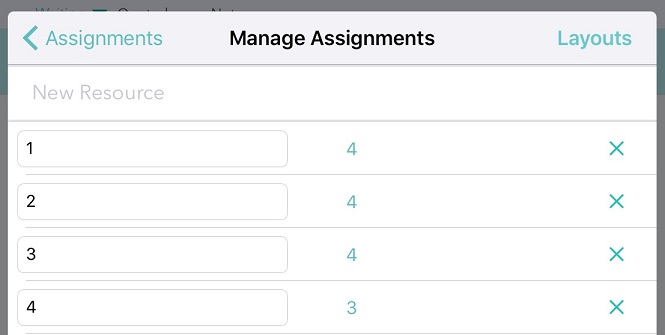
Or in the app, press the gear icon > Manage Assignments > Assignments. You’ll see the same options to name your resource, add a size, and edit/delete as needed.
There is an option to require an assignment when adding the customer to the list so the staff doesn’t forget. In the app, go to the gear icon > Customization > Adding Customers > Assignments. You’ll see the setting to require a resource assignment as each client is added to the list.
For more information, check out our overviews of managing your tables or resources, depending on your business.
Related table management features: Table Views | Section Setup | Stats
Online, you can go to Account > Settings > Resources. Change the names to whatever fits you – table numbers, stylist names, bowling lanes, etc. If your resource can accommodate a specific size, such as the number of seats at a table, add that as well. (If you serve individuals instead of parties, you can change your settings so you won’t see a group size option for resources. From the main waitlist page, that’s under the gear icon > Customization > Terms.)
Or in the app, press the gear icon > Manage Assignments > Assignments. You’ll see the same options to name your resource, add a size, and edit/delete as needed.
There is an option to require an assignment when adding the customer to the list so the staff doesn’t forget. In the app, go to the gear icon > Customization > Adding Customers > Assignments. You’ll see the setting to require a resource assignment as each client is added to the list.
For more information, check out our overviews of managing your tables or resources, depending on your business.
Related table management features: Table Views | Section Setup | Stats